wink

有的鸟是不会被关住的, 因为它们的羽毛太耀眼了.

  • main

wink

有的鸟是不会被关住的, 因为它们的羽毛太耀眼了.

  • main

TiDB 源码分析之 Order By

2017-12-05

Order by 源码分析

查询优化器是关系型数据库的核心, 也是 TiDB 代码中最难懂的部分, 这篇文章可以作为 TiDB 查询优化器源码分析的开端, 可能会在文章的过程中掺杂一些跟 Order by 不相关的代码分析. 希望这一个系列能对我跟大家都有帮助.

parser

分析语句的正确方式是从 parser 入手看构造了哪些相关的 ast 结构:

1
2
3
4
5
6
7
8
9
10
11
12
13
14
15
16
17
18
19
20
21
22
23
24
25
26
27
28
29
30
31
32
33
34
35
36
37
38
39
40
41
42
43
OrderBy:
"ORDER" "BY" ByList
{
$$ = &ast.OrderByClause{Items: $3.([]*ast.ByItem)}
}
ByList:
ByItem
{
$$ = []*ast.ByItem{$1.(*ast.ByItem)}
}
| ByList ',' ByItem
{
$$ = append($1.([]*ast.ByItem), $3.(*ast.ByItem))
}
ByItem:
Expression Order
{
expr := $1
valueExpr, ok := expr.(*ast.ValueExpr)
if ok {
position, isPosition := valueExpr.GetValue().(int64)
if isPosition {
expr = &ast.PositionExpr{N: int(position)}
}
}
$$ = &ast.ByItem{Expr: expr, Desc: $2.(bool)}
}
Order:
/* EMPTY */
{
$$ = false // ASC by default
}
| "ASC"
{
$$ = false
}
| "DESC"
{
$$ = true
}

这里可以看到 oder by 的主要数据结构就是 ast.ByItem:

1
2
3
4
5
6
7
// ByItem represents an item in order by or group by.
type ByItem struct {
node
Expr ExprNode
Desc bool
}

plan

然后直接看到 planBuilder.buildSelect:

1
2
3
4
5
6
7
8
9
func (b *planBuilder) buildSelect(sel *ast.SelectStmt) LogicalPlan {
...
if sel.OrderBy != nil {
p = b.buildSort(p, sel.OrderBy.Items, orderMap) // 这个 orderMap 会在下面解释.
if b.err != nil {
return nil
}
}
}

这里会给 order by 创建一个 Sort 的逻辑计划:

1
2
3
4
5
6
7
8
9
// Sort stands for the order by plan.
type Sort struct {
*basePlan
baseLogicalPlan
basePhysicalPlan
ByItems []*ByItems
ExecLimit *Limit // no longer be used by new plan
}

我们首先看一下resolveHavingAndOrderBy, 这里会对 oderBY 的 item 执行一遍 havingAndOrderbyExprResolver, 主要是找到 orderBY 中带有聚合函数的相关联的column, 然后把 AggregateFuncExpr 里面的参数替换成对应 selectFields 里面的 SelectField, 然后得到 aggMapper.

1
2
3
4
5
6
7
8
9
10
11
12
13
14
15
16
17
18
19
20
21
22
23
24
25
26
27
28
29
30
31
32
33
34
35
36
37
38
39
40
41
42
43
44
// resolveHavingAndOrderBy will process aggregate functions and resolve the columns that don't exist in select fields.
// If we found some columns that are not in select fields, we will append it to select fields and update the colMapper.
// When we rewrite the order by / having expression, we will find column in map at first.
func (b *planBuilder) resolveHavingAndOrderBy(sel *ast.SelectStmt, p LogicalPlan) (
map[*ast.AggregateFuncExpr]int, map[*ast.AggregateFuncExpr]int) {
extractor := &havingAndOrderbyExprResolver{
p: p,
selectFields: sel.Fields.Fields,
aggMapper: make(map[*ast.AggregateFuncExpr]int),
colMapper: b.colMapper,
outerSchemas: b.outerSchemas,
}
if sel.GroupBy != nil {
extractor.gbyItems = sel.GroupBy.Items
}
// Extract agg funcs from having clause.
if sel.Having != nil {
extractor.curClause = havingClause
n, ok := sel.Having.Expr.Accept(extractor)
if !ok {
b.err = errors.Trace(extractor.err)
return nil, nil
}
sel.Having.Expr = n.(ast.ExprNode)
}
havingAggMapper := extractor.aggMapper
extractor.aggMapper = make(map[*ast.AggregateFuncExpr]int)
extractor.orderBy = true
extractor.inExpr = false
// Extract agg funcs from order by clause.
if sel.OrderBy != nil {
extractor.curClause = orderByClause
for _, item := range sel.OrderBy.Items {
n, ok := item.Expr.Accept(extractor)
if !ok {
b.err = errors.Trace(extractor.err)
return nil, nil
}
item.Expr = n.(ast.ExprNode)
}
}
sel.Fields.Fields = extractor.selectFields
return havingAggMapper, extractor.aggMapper
}

通过 resolveHavingAndOrderBy 的Enter, Leave 我们可以看到, 走到AggregateFuncExpr 的时候, 它会对每一个ColumnNameExpr参数, 调用 Accept, 来 rewrite. 最终可以看到在havingAndOrderbyExprResolver.Leave 的 相应 ColumnNameExpr 处理中, 会把自己转换为 a.selectFields[index].Expr.

1
2
3
4
5
6
7
8
9
10
11
12
13
14
15
16
// Accept implements Node Accept interface.
func (n *AggregateFuncExpr) Accept(v Visitor) (Node, bool) {
newNode, skipChildren := v.Enter(n)
if skipChildren {
return v.Leave(newNode)
}
n = newNode.(*AggregateFuncExpr)
for i, val := range n.Args {
node, ok := val.Accept(v)
if !ok {
return n, false
}
n.Args[i] = node.(ExprNode) // 在这里被改写.
}
return v.Leave(n)
}

然后对于ast.AggregateFuncExpr 自己, 会在 a.selectFields 中 append 一个辅助的 SelectField 到最后, 并且在a.aggMapper 设置自己在 selectFields 数组中的索引, 方便 Sort 算子使用.

1
2
3
4
5
6
7
8
case *ast.AggregateFuncExpr:
a.inAggFunc = false
a.aggMapper[v] = len(a.selectFields)
a.selectFields = append(a.selectFields, &ast.SelectField{
Auxiliary: true,
Expr: v,
AsName: model.NewCIStr(fmt.Sprintf("sel_agg_%d", len(a.selectFields))),
})

planBuilder.BuildSort 创建 Logical Plan

下面我们再来看看 BuildSort:

1
2
3
4
5
6
7
8
9
10
11
12
13
14
15
16
17
18
func (b *planBuilder) buildSort(p LogicalPlan, byItems []*ast.ByItem, aggMapper map[*ast.AggregateFuncExpr]int) LogicalPlan {
b.curClause = orderByClause
sort := Sort{}.init(b.ctx)
exprs := make([]*ByItems, 0, len(byItems))
for _, item := range byItems {
it, np, err := b.rewrite(item.Expr, p, aggMapper, true) // 这里会对 byItems 做 rewrite, 方便后续的处理.
if err != nil {
b.err = err
return nil
}
p = np
exprs = append(exprs, &ByItems{Expr: it, Desc: item.Desc})
}
sort.ByItems = exprs
setParentAndChildren(sort, p)
sort.SetSchema(p.Schema().Clone())
return sort
}

这里 rewrite 的意思大概是, 比如有一些可以在这个时期就算出来的结果, 就可以做常量折叠, 比如 YEAR('2009-05-19'); 直接可以用 2009 表示, 或者 1 + 1 这种表达式. 当然还有一些其他情况会做转换. TiDB 里面很多用到的是 Visitor 模式, 这里就不详细解释了, OrderBy 子句大部分是 ColumnNameExpr. 这里 rewritor 会通过 func (er *expressionRewriter) toColumn(v *ast.ColumnName) 把它转成对应 Schema 的 Column 对象.

所以到这里 sort.ByItems 就构造完成了, 让我们继续往下看.

Physical Plan

之后会调用 logic.convert2NewPhysicalPlan 将逻辑计划转为物理计划.

对于语句 select * from t order by a;, 它在这里的 LogicalPlan 层级关系是: Sort --> Projection --> DataSource.
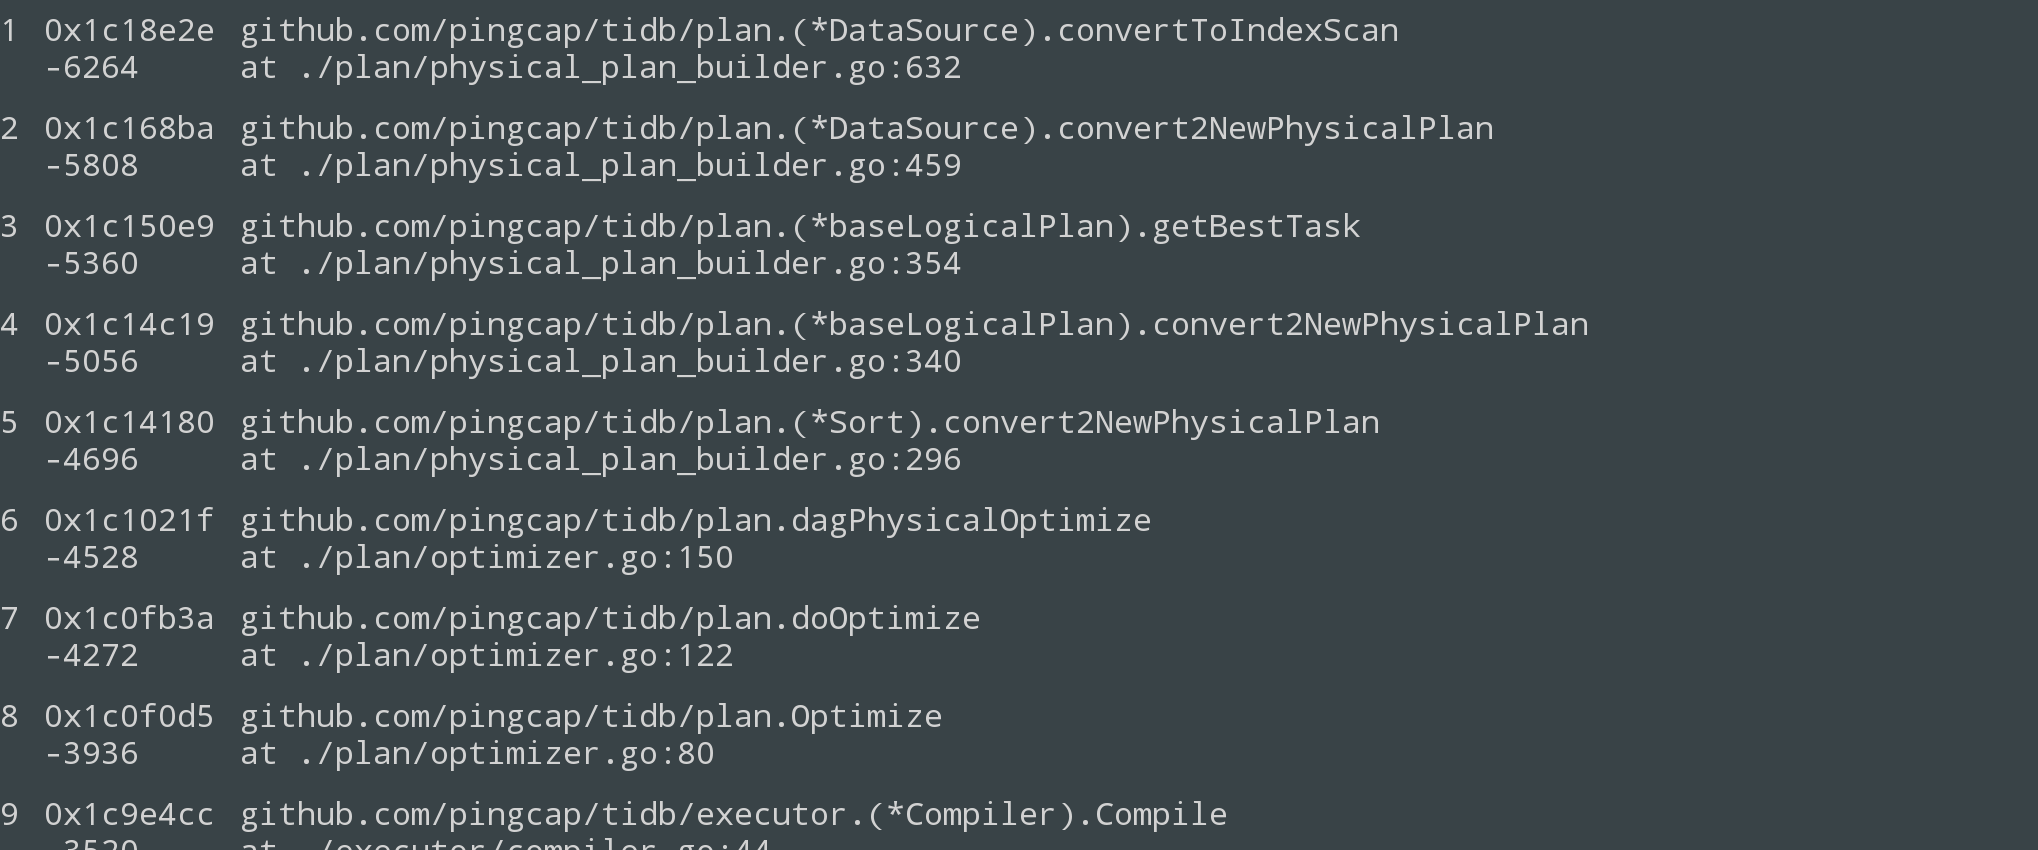
调用链大概如下:

call_stack

1
2
3
4
5
6
7
8
9
10
11
12
13
14
15
16
17
18
19
20
21
22
23
24
25
26
27
28
29
30
31
32
33
34
35
36
func (p *Sort) convert2NewPhysicalPlan(prop *requiredProp) (task, error) {
t := p.getTask(prop)
if t != nil {
return t, nil
}
if prop.taskTp != rootTaskType {
// TODO: This is a trick here, because an operator that can be pushed to Coprocessor can never be pushed across sort.
// e.g. If an aggregation want to be pushed, the SQL is always like select count(*) from t order by ...
// The Sort will on top of Aggregation. If the SQL is like select count(*) from (select * from s order by k).
// The Aggregation will also be blocked by projection. In the future we will break this restriction.
p.storeTask(prop, invalidTask)
return invalidTask, nil
}
// enforce branch
// 对于 select * from t order by a, sort plan 的第一个孩子是 Projection, 由于 Projection 没有实现convert2NewPhysicalPlan,
// 所以调用的是 baseLogicalPlan.convert2NewPhysicalPlan
t, err := p.children[0].(LogicalPlan).convert2NewPhysicalPlan(&requiredProp{taskTp: rootTaskType, expectedCnt: math.MaxFloat64})
if err != nil {
return nil, errors.Trace(err)
}
t = p.attach2Task(t)
newProp, canPassProp := getPropByOrderByItems(p.ByItems)
if canPassProp {
newProp.expectedCnt = prop.expectedCnt
orderedTask, err := p.children[0].(LogicalPlan).convert2NewPhysicalPlan(newProp)
if err != nil {
return nil, errors.Trace(err)
}
if orderedTask.cost() < t.cost() {
t = orderedTask
}
}
t = prop.enforceProperty(t, p.ctx)
p.storeTask(prop, t)
return t, nil
}

这里值得注意的是, 在 Sort.convert2NewPhysicalPlan 里面, 分别两次调用了 p.children[0].(LogicalPlan).convert2NewPhysicalPlan, 所不同的只是, 在第二次的时候, 在 requiredProp 里面加入了 order by 相应的列. 这个其实是用来比较两次出来的计划的代价, 来决定是不是下推这个 order by. 然后会把 copTask 的 keepOrder 设置为 true. 如果发现这个 order by 可以下推, 比如刚好 order by 的是主键或者是索引, 那么这个时候就不需要构造一个 Sort 的物理计划了, 直接是一个 PhysicalTableReader 或者 PhysicalIndexReader 或者 PhysicalIndexLookupReader.

具体用到这个 requiredProp 的 cols, 是在 Sort 的 children DataSource 的convertToIndexScan:

1
2
3
4
5
6
7
8
9
10
11
12
13
if !prop.isEmpty() {
for i, col := range idx.Columns {
// not matched
if col.Name.L == prop.cols[0].ColName.L {
matchProperty = matchIndicesProp(idx.Columns[i:], prop.cols)
break
} else if i >= len(is.AccessCondition) {
break
} else if sf, ok := is.AccessCondition[i].(*expression.ScalarFunction); !ok || sf.FuncName.L != ast.EQ {
break
}
}
}

在 baseLogicalPlan.convert2NewPhysicalPlan 大体就是得到一个最优的 task, 然后通过 p.storeTask(prop, t) 存到 p.taskMap 里面:

1
2
3
4
5
6
7
8
9
10
// task is a new version of `PhysicalPlanInfo`. It stores cost information for a task.
// A task may be CopTask, RootTask, MPPTask or a ParallelTask.
type task interface {
count() float64
addCost(cost float64)
cost() float64
copy() task
plan() PhysicalPlan
invalid() bool
}

之后它会调用到 child 的 DataSource.convert2NewPhysicalPlan. 这里会遍历所有可能的索引, 然后选择一个最小代价的计划.

1
2
3
4
5
6
7
8
9
10
11
12
13
14
15
16
17
18
19
20
21
22
23
24
25
26
27
28
29
30
31
32
33
34
35
36
37
38
39
40
41
42
43
44
45
46
47
48
49
50
51
52
53
// It will enumerate all the available indices and choose a plan with least cost.
func (p *DataSource) convert2NewPhysicalPlan(prop *requiredProp) (task, error) {
if prop == nil {
return nil, nil
}
t := p.getTask(prop)
if t != nil {
return t, nil
}
t, err := p.tryToGetDualTask()
if err != nil {
return nil, errors.Trace(err)
}
if t != nil {
p.storeTask(prop, t)
return t, nil
}
t, err = p.tryToGetMemTask(prop)
if err != nil {
return nil, errors.Trace(err)
}
if t != nil {
p.storeTask(prop, t)
return t, nil
}
// TODO: We have not checked if this table has a predicate. If not, we can only consider table scan.
indices := p.availableIndices.indices
includeTableScan := p.availableIndices.includeTableScan
t = invalidTask
// 它这里先会创建一个 PhysicalTableReader 的 copTask, 会在下面再创建一个 indexReader, 如果 idxTask 的代价小于 TableReader 的 copTask, 那么会选 indexReader
if includeTableScan {
t, err = p.convertToTableScan(prop)
if err != nil {
return nil, errors.Trace(err)
}
}
if !includeTableScan || len(p.pushedDownConds) > 0 || len(prop.cols) > 0 {
for _, idx := range indices {
idxTask, err := p.convertToIndexScan(prop, idx)
if err != nil {
return nil, errors.Trace(err)
}
// 这里会选一个 cost 最小的 IndexScan, 具体这个 IndexScan 是怎么转换得来的,
// 可以看下面的 DataSource.convertToIndexScan 一节.
if idxTask.cost() < t.cost() {
t = idxTask
}
}
}
p.storeTask(prop, t)
return t, nil
}

DataSource.convertToTableScan

TiDB 里面把读取表的物理计划, 都叫做 TableScan, 它会用一个 range 的对象来表示范围, 如果是全表扫, 那就是[-inc, +inc], 如果是点查, 那就是 [begin, end], begin == end, 所以看看这里是怎么把 DataSource 转为 TableScan的.

对于表:

1
2
3
4
5
6
create table t1(
a int,
b int,
primary key(a),
key b_idx(b)
);

执行的操作 select * from t1 where b = 2 order by b;, 我们再来分析下面的函数, 会比较好阐述.

1
2
3
4
5
6
7
8
9
10
11
12
13
14
15
16
17
18
19
20
21
22
23
24
25
26
27
28
29
30
31
32
33
34
35
36
37
38
39
40
41
42
43
44
45
46
47
48
49
50
51
52
53
54
55
56
57
58
59
60
61
62
63
64
65
66
67
68
69
70
71
72
73
74
75
76
77
78
79
80
81
82
83
84
85
86
87
88
89
90
91
92
93
94
95
// convertToTableScan converts the DataSource to table scan.
func (p *DataSource) convertToTableScan(prop *requiredProp) (task task, err error) {
if prop.taskTp == copDoubleReadTaskType {
return &copTask{cst: math.MaxFloat64}, nil
}
ts := PhysicalTableScan{
Table: p.tableInfo,
Columns: p.Columns,
TableAsName: p.TableAsName,
DBName: p.DBName,
}.init(p.ctx)
ts.SetSchema(p.schema)
sc := p.ctx.GetSessionVars().StmtCtx
ts.Ranges = ranger.FullIntRange()
var pkCol *expression.Column
if ts.Table.PKIsHandle {
if pkColInfo := ts.Table.GetPkColInfo(); pkColInfo != nil {
pkCol = expression.ColInfo2Col(ts.schema.Columns, pkColInfo)
}
}
if len(p.pushedDownConds) > 0 {
conds := make([]expression.Expression, 0, len(p.pushedDownConds))
for _, cond := range p.pushedDownConds {
conds = append(conds, cond.Clone())
}
if pkCol != nil {
var ranges []ranger.Range
// ranger.DetachCondsForTableRange 是把过滤条件条件剔除出来,
// 如果是跟pkCol 相关的, 会放在ts.AccessCondition 数组,
// 如果是其他的列, 那么就放在 ts.filterCondition
ts.AccessCondition, ts.filterCondition = ranger.DetachCondsForTableRange(p.ctx, conds, pkCol)
// 这里的 range 包括: IntColumnRange(TableRange), ColumnRange, IndexRange. 当然这里是 ranger.IntRangeType (TableRange).
// 对于 select * from t1 where b = 2 order by b; 这里的 ts.AccessCondition 为空, 所以得出的 range 就是 FullRange, 全表.
// 过滤是需要通过索引 b 来做的, pk 做不了什么.
ranges, err = ranger.BuildRange(sc, ts.AccessCondition, ranger.IntRangeType, []*expression.Column{pkCol}, nil)
ts.Ranges = ranger.Ranges2IntRanges(ranges)
if err != nil {
return nil, errors.Trace(err)
}
} else {
// 如果 primary key 不是 Handle 的话(这个含义需要结合 TiDB 对于主键的处理来理解), 那么所有的条件都放在 ts.filterCondition
ts.filterCondition = conds
}
}
ts.profile = p.getStatsProfileByFilter(p.pushedDownConds)
statsTbl := p.statisticTable
rowCount := float64(statsTbl.Count)
if pkCol != nil {
// TODO: We can use p.getStatsProfileByFilter(accessConditions).
rowCount, err = statsTbl.GetRowCountByIntColumnRanges(sc, pkCol.ID, ts.Ranges)
if err != nil {
return nil, errors.Trace(err)
}
}
copTask := &copTask{
tablePlan: ts,
indexPlanFinished: true,
}
task = copTask
matchProperty := len(prop.cols) == 1 && pkCol != nil && prop.cols[0].Equal(pkCol, nil)
if matchProperty && prop.expectedCnt < math.MaxFloat64 {
selectivity, err := p.statisticTable.Selectivity(p.ctx, ts.filterCondition)
if err != nil {
log.Warnf("An error happened: %v, we have to use the default selectivity", err.Error())
selectivity = selectionFactor
}
rowCount = math.Min(prop.expectedCnt/selectivity, rowCount)
}
ts.expectedCnt = rowCount
copTask.cst = rowCount * scanFactor
if matchProperty {
if prop.desc {
ts.Desc = true
copTask.cst = rowCount * descScanFactor
}
ts.KeepOrder = true
copTask.keepOrder = true
ts.addPushedDownSelection(copTask, p.profile, prop.expectedCnt)
} else {
expectedCnt := math.MaxFloat64
if prop.isEmpty() {
expectedCnt = prop.expectedCnt
} else {
return invalidTask, nil
}
// 这里会把 filterCondition 转成 PhysicalSelection
ts.addPushedDownSelection(copTask, p.profile, expectedCnt)
}
if prop.taskTp == rootTaskType {
task = finishCopTask(task, p.ctx)
} else if _, ok := task.(*rootTask); ok {
return invalidTask, nil
}
return task, nil
}

DataSource.convertToIndexScan

在 DataSource.convert2NewPhysicalPlan 中:

1
2
3
4
5
6
7
8
9
10
11
if !includeTableScan || len(p.pushedDownConds) > 0 || len(prop.cols) > 0 {
for _, idx := range indices {
idxTask, err := p.convertToIndexScan(prop, idx)
if err != nil {
return nil, errors.Trace(err)
}
if idxTask.cost() < t.cost() {
t = idxTask
}
}
}

会尝试把每个 index 都转成 IndexScan:

1
2
3
4
5
6
7
8
9
10
11
12
13
14
15
16
17
18
19
20
21
22
23
24
25
26
27
28
29
30
31
32
33
34
35
36
37
38
39
40
41
42
43
44
45
46
47
48
49
50
51
52
53
54
55
56
57
58
59
60
61
62
63
64
65
66
67
68
69
70
71
72
73
74
75
76
77
78
79
80
81
82
83
84
85
86
87
88
89
90
91
92
93
94
95
96
97
98
99
100
101
102
103
104
105
106
107
108
109
110
// convertToIndexScan converts the DataSource to index scan with idx.
func (p *DataSource) convertToIndexScan(prop *requiredProp, idx *model.IndexInfo) (task task, err error) {
is := PhysicalIndexScan{
Table: p.tableInfo,
TableAsName: p.TableAsName,
DBName: p.DBName,
Columns: p.Columns,
Index: idx,
dataSourceSchema: p.schema,
}.init(p.ctx)
statsTbl := p.statisticTable
rowCount := float64(statsTbl.Count)
sc := p.ctx.GetSessionVars().StmtCtx
idxCols, colLengths := expression.IndexInfo2Cols(p.Schema().Columns, idx)
is.Ranges = ranger.FullIndexRange()
if len(p.pushedDownConds) > 0 {
conds := make([]expression.Expression, 0, len(p.pushedDownConds))
for _, cond := range p.pushedDownConds {
conds = append(conds, cond.Clone())
}
if len(idxCols) > 0 {
var ranges []ranger.Range
is.AccessCondition, is.filterCondition = ranger.DetachIndexConditions(conds, idxCols, colLengths)
ranges, err = ranger.BuildRange(sc, is.AccessCondition, ranger.IndexRangeType, idxCols, colLengths)
if err != nil {
return nil, errors.Trace(err)
}
is.Ranges = ranger.Ranges2IndexRanges(ranges)
rowCount, err = statsTbl.GetRowCountByIndexRanges(sc, is.Index.ID, is.Ranges)
if err != nil {
return nil, errors.Trace(err)
}
} else {
is.filterCondition = conds
}
}
is.profile = p.getStatsProfileByFilter(p.pushedDownConds)
cop := &copTask{
indexPlan: is,
}
if !isCoveringIndex(is.Columns, is.Index.Columns, is.Table.PKIsHandle) {
// 如果索引里面没有全部的数据, 有一些列需要去拿 handle 绑定的value, 这个叫做
// double read
// On this way, it's double read case.
cop.tablePlan = PhysicalTableScan{Columns: p.Columns, Table: is.Table}.init(p.ctx)
cop.tablePlan.SetSchema(p.schema.Clone())
// If it's parent requires single read task, return max cost.
if prop.taskTp == copSingleReadTaskType {
return &copTask{cst: math.MaxFloat64}, nil
}
} else if prop.taskTp == copDoubleReadTaskType {
// If it's parent requires double read task, return max cost.
return &copTask{cst: math.MaxFloat64}, nil
}
is.initSchema(p.id, idx, cop.tablePlan != nil)
// Check if this plan matches the property.
matchProperty := false
if !prop.isEmpty() {
for i, col := range idx.Columns {
// not matched
if col.Name.L == prop.cols[0].ColName.L {
matchProperty = matchIndicesProp(idx.Columns[i:], prop.cols)
break
} else if i >= len(is.AccessCondition) {
break
} else if sf, ok := is.AccessCondition[i].(*expression.ScalarFunction); !ok || sf.FuncName.L != ast.EQ {
break
}
}
}
if matchProperty && prop.expectedCnt < math.MaxFloat64 {
selectivity, err := p.statisticTable.Selectivity(p.ctx, is.filterCondition)
if err != nil {
log.Warnf("An error happened: %v, we have to use the default selectivity", err.Error())
selectivity = selectionFactor
}
rowCount = math.Min(prop.expectedCnt/selectivity, rowCount)
}
is.expectedCnt = rowCount
cop.cst = rowCount * scanFactor
task = cop
if matchProperty {
if prop.desc {
is.Desc = true
cop.cst = rowCount * descScanFactor
}
if cop.tablePlan != nil {
cop.tablePlan.(*PhysicalTableScan).appendExtraHandleCol(p)
}
cop.keepOrder = true
is.addPushedDownSelection(cop, p, prop.expectedCnt)
} else {
is.OutOfOrder = true
expectedCnt := math.MaxFloat64
if prop.isEmpty() {
expectedCnt = prop.expectedCnt
} else {
return invalidTask, nil
}
// 这里把过滤条件转换为 PhysicalSelection
is.addPushedDownSelection(cop, p, expectedCnt)
}
if prop.taskTp == rootTaskType {
task = finishCopTask(task, p.ctx)
} else if _, ok := task.(*rootTask); ok {
return invalidTask, nil
}
return task, nil
}

在 finishCopTask 里面, 会最终计算task 的 cost, 然后会根据 task 里面的 tablePlan 跟 indexPlan 构造最后的物理计划:

  • PhysicalIndexLookUpReader: 如果 tablePlan 跟 indexPlan 都提供
  • PhysicalIndexReader: 如果只有 indexPlan
  • PhysicalTableReader

getBestTask

这一步是 baseLogicalPlan.convert2NewPhysicalPlan 中调用的, 这里可以看到它会迭代 child 的 convert2NewPhysicalPlan, 把它们都转换成 task 对象. 然后选出最佳的 copTask.

1
2
3
4
5
6
7
8
9
10
11
12
13
14
15
16
17
18
19
20
21
func (p *baseLogicalPlan) getBestTask(bestTask task, prop *requiredProp, pp PhysicalPlan) (task, error) {
newProps := pp.getChildrenPossibleProps(prop)
for _, newProp := range newProps {
tasks := make([]task, 0, len(p.basePlan.children))
for i, child := range p.basePlan.children {
childTask, err := child.(LogicalPlan).convert2NewPhysicalPlan(newProp[i])
if err != nil {
return nil, errors.Trace(err)
}
tasks = append(tasks, childTask)
}
// 这里是关键, 会计算 task 的代价, 如果当前resultTask 代价小于 bestTask,
// 那么会替换当前的 bestTask. 最终选出最优的 task
// attach2Task 是把 child 的 tasks attach 到当前的 Physical plan, 然后再计算总体代价
resultTask := pp.attach2Task(tasks...)
if resultTask.cost() < bestTask.cost() {
bestTask = resultTask
}
}
return bestTask, nil
}

基本分析到这里, 基本上 sort 的 plan 部分就结束了. 之后就进入到执行器 Executor 部分了, 我们来看看

SortExec

之后代码会进入到 ExecStmt.buildExecutor, 在这里, TiDB 会构造最终的执行器. 对于 Sort:

1
2
3
4
5
6
7
8
9
10
11
12
13
14
15
16
17
18
19
20
func (b *executorBuilder) buildSort(v *plan.Sort) Executor {
childExec := b.build(v.Children()[0]) // 先 build 孩子算子的执行器, 一层一层 build
if b.err != nil {
b.err = errors.Trace(b.err)
return nil
}
sortExec := SortExec{
baseExecutor: newBaseExecutor(v.Schema(), b.ctx, childExec),
ByItems: v.ByItems,
schema: v.Schema(),
}
sortExec.supportChk = true
if v.ExecLimit != nil {
return &TopNExec{
SortExec: sortExec,
limit: v.ExecLimit,
}
}
return &sortExec
}

有了 SortExec 之后, TiDB 会调用它的 Next() 接口:

1
2
3
4
5
6
7
8
9
10
11
12
13
14
15
16
17
18
19
20
21
22
23
24
25
26
27
28
29
30
31
32
33
34
35
36
func (e *SortExec) Next(goCtx goctx.Context) (Row, error) {
if !e.fetched {
for {
srcRow, err := e.children[0].Next(goCtx)
if err != nil {
return nil, errors.Trace(err)
}
if srcRow == nil {
break
}
orderRow := &orderByRow{
row: srcRow,
key: make([]*types.Datum, len(e.ByItems)),
}
for i, byItem := range e.ByItems {
key, err := byItem.Expr.Eval(srcRow)
if err != nil {
return nil, errors.Trace(err)
}
orderRow.key[i] = &key
}
e.Rows = append(e.Rows, orderRow)
}
sort.Sort(e)
e.fetched = true
}
if e.err != nil {
return nil, errors.Trace(e.err)
}
if e.Idx >= len(e.Rows) {
return nil, nil
}
row := e.Rows[e.Idx].row
e.Idx++
return row, nil
}

自此, Order by 的代码基本就结束了. 其中还有很多细节没有详细解释, 需要大家看代码去深入了解.

more >>

TiDB 源码分析之 Bootstrap

2017-09-29

Bootstrap

TiDB的Bootstrap是启动的时候的初始化过程, 由session.go: BootstrapSession完成.

在 tidb-server/main.go 的 createStoreAndDomain 被调用

bootstrap 分为两种, 它首先会去查看 tikv 中的 BootstrapKey, 取得当前的bootstapVersion, 如果为0, 那么就是新集群, 作 bootstrap, 如果低于 currentBootstrapVersion, 那么就做 upgrade:

1
2
3
4
5
6
7
8
9
func BootstrapSession(store kv.Storage) (*domain.Domain, error) {
ver := getStoreBootstrapVersion(store)
if ver == notBootstrapped {
runInBootstrapSession(store, bootstrap)
} else if ver < currentBootstrapVersion {
runInBootstrapSession(store, upgrade)
}
...

bootstap:

1
2
3
4
5
6
7
8
9
10
11
12
13
// bootstrap initiates system DB for a store.
func bootstrap(s Session) {
b, err := checkBootstrapped(s)
if err != nil {
log.Fatal(err)
}
if b {
upgrade(s)
return
}
doDDLWorks(s) // 创建一些系统表
doDMLWorks(s) // 插入一下元数据到系统表
}

upgrade:

1
2
3
4
5
6
7
8
9
10
11
12
13
14
15
func upgrade(s Session) {
ver, err := getBootstrapVersion(s)
if err != nil {
log.Fatal(errors.Trace(err))
}
if ver >= currentBootstrapVersion {
// It is already bootstrapped/upgraded by a higher version TiDB server.
return
}
...
if ver < version15 {
upgradeToVer15(s) // 例如这里创建了mysql.gc_delete_range
}
...
}

sysvar

所有系统的变量, 都定义在在 sysvar.go 中的 defaultSysVars, 在 init 里面设置到了 SysVars map中

在 doDMLWorks 时, 会逐一插入到 mysql.GLOBAL_VARIABLES 表中

LoadPrivilegeLoop

因为 TiDB 是分布式的, 所以在 TiDB 中的 privilege 可能被其他的 TiDB 修改了, 所以 TiDB 使用了 etcd, 在 更改了 privilege 的时候通知所有的tidb 去 load 新的 priilege.

1
2
3
4
5
6
7
8
9
10
11
12
13
14
15
16
17
18
19
20
21
22
23
24
25
26
27
28
29
30
31
32
33
34
35
36
37
38
39
40
41
42
43
44
45
46
47
48
// LoadPrivilegeLoop create a goroutine loads privilege tables in a loop, it
// should be called only once in BootstrapSession.
func (do *Domain) LoadPrivilegeLoop(ctx context.Context) error {
ctx.GetSessionVars().InRestrictedSQL = true
do.privHandle = privileges.NewHandle()
err := do.privHandle.Update(ctx)
if err != nil {
return errors.Trace(err)
}
var watchCh clientv3.WatchChan
duration := 5 * time.Minute
if do.etcdClient != nil {
watchCh = do.etcdClient.Watch(goctx.Background(), privilegeKey)
duration = 10 * time.Minute
}
go func() {
var count int
for {
ok := true
select {
case <-do.exit:
return
case _, ok = <-watchCh:
case <-time.After(duration):
}
if !ok {
log.Error("[domain] load privilege loop watch channel closed.")
watchCh = do.etcdClient.Watch(goctx.Background(), privilegeKey)
count++
if count > 10 {
time.Sleep(time.Duration(count) * time.Second)
}
continue
}
count = 0
err := do.privHandle.Update(ctx) // 这里会更新所有的 priv 到内存
if err != nil {
log.Error("[domain] load privilege fail:", errors.ErrorStack(err))
} else {
log.Info("[domain] reload privilege success.")
}
}
}()
return nil
}

UpdateTableStatsLoop

用来做 Analyze 的

1
2
3
4
5
6
7
8
9
10
11
12
13
14
15
16
17
18
19
20
21
22
23
24
// UpdateTableStatsLoop creates a goroutine loads stats info and updates stats info in a loop.
// It will also start a goroutine to analyze tables automatically.
// It should be called only once in BootstrapSession.
func (do *Domain) UpdateTableStatsLoop(ctx context.Context) error {
ctx.GetSessionVars().InRestrictedSQL = true
statsHandle := statistics.NewHandle(ctx, do.statsLease)
atomic.StorePointer(&do.statsHandle, unsafe.Pointer(statsHandle))
do.ddl.RegisterEventCh(statsHandle.DDLEventCh())
err := statsHandle.Update(do.InfoSchema())
if err != nil {
return errors.Trace(err)
}
lease := do.statsLease
if lease <= 0 {
return nil
}
do.wg.Add(1)
go do.updateStatsWorker(ctx, lease)
if RunAutoAnalyze {
do.wg.Add(1)
go do.autoAnalyzeWorker(lease)
}
return nil
}

GCWorker

GCWorker 也是在 BootstrapSession 被启动:

1
2
3
4
5
6
if raw, ok := store.(domain.EtcdBackend); ok {
err = raw.StartGCWorker()
if err != nil {
return nil, errors.Trace(err)
}
}

GCWorker 主要做以下3件事情:

  1. DDL的DropTable, DropIndex等的Delete range操作
  2. tikv GC, 基于lifetime来清理保存的历史数据TiDB 读取历史版本数据
  3. 扫描全库, 查找过期的Locks.

more >>

golang build

2017-09-19

from https://golang.org/pkg/go/build/

Go Path

The Go path is a list of directory trees containing Go source code. It is consulted to resolve imports that cannot be found in the standard Go tree. The default path is the value of the GOPATH environment variable, interpreted as a path list appropriate to the operating system (on Unix, the variable is a colon-separated string; on Windows, a semicolon-separated string; on Plan 9, a list).

Each directory listed in the Go path must have a prescribed structure:

The src/ directory holds source code. The path below ‘src’ determines the import path or executable name.

The pkg/ directory holds installed package objects. As in the Go tree, each target operating system and architecture pair has its own subdirectory of pkg (pkg/GOOS_GOARCH).

If DIR is a directory listed in the Go path, a package with source in DIR/src/foo/bar can be imported as “foo/bar” and has its compiled form installed to “DIR/pkg/GOOS_GOARCH/foo/bar.a” (or, for gccgo, “DIR/pkg/gccgo/foo/libbar.a”).

The bin/ directory holds compiled commands. Each command is named for its source directory, but only using the final element, not the entire path. That is, the command with source in DIR/src/foo/quux is installed into DIR/bin/quux, not DIR/bin/foo/quux. The foo/ is stripped so that you can add DIR/bin to your PATH to get at the installed commands.

Here’s an example directory layout:

1
2
3
4
5
6
7
8
9
10
11
12
13
14
15
GOPATH=/home/user/gocode
/home/user/gocode/
src/
foo/
bar/ (go code in package bar)
x.go
quux/ (go code in package main)
y.go
bin/
quux (installed command)
pkg/
linux_amd64/
foo/
bar.a (installed package object)

Build Constraints

A build constraint, also known as a build tag, is a line comment that begins

1
// +build

that lists the conditions under which a file should be included in the package. Constraints may appear in any kind of source file (not just Go), but they must appear near the top of the file, preceded only by blank lines and other line comments. These rules mean that in Go files a build constraint must appear before the package clause.

To distinguish build constraints from package documentation, a series of build constraints must be followed by a blank line.

A build constraint is evaluated as the OR of space-separated options; each option evaluates as the AND of its comma-separated terms; and each term is an alphanumeric word or, preceded by !, its negation. That is, the build constraint:

1
// +build linux,386 darwin,!cgo

corresponds to the boolean formula:

1
(linux AND 386) OR (darwin AND (NOT cgo))

A file may have multiple build constraints. The overall constraint is the AND of the individual constraints. That is, the build constraints:

1
2
// +build linux darwin
// +build 386

corresponds to the boolean formula:

1
(linux OR darwin) AND 386

During a particular build, the following words are satisfied:

1
2
3
4
5
6
7
8
9
10
11
12
13
14
- the target operating system, as spelled by runtime.GOOS
- the target architecture, as spelled by runtime.GOARCH
- the compiler being used, either "gc" or "gccgo"
- "cgo", if ctxt.CgoEnabled is true
- "go1.1", from Go version 1.1 onward
- "go1.2", from Go version 1.2 onward
- "go1.3", from Go version 1.3 onward
- "go1.4", from Go version 1.4 onward
- "go1.5", from Go version 1.5 onward
- "go1.6", from Go version 1.6 onward
- "go1.7", from Go version 1.7 onward
- "go1.8", from Go version 1.8 onward
- "go1.9", from Go version 1.9 onward
- any additional words listed in ctxt.BuildTags

If a file’s name, after stripping the extension and a possible _test suffix, matches any of the following patterns:

1
2
3
*_GOOS
*_GOARCH
*_GOOS_GOARCH

(example: source_windows_amd64.go) where GOOS and GOARCH represent any known operating system and architecture values respectively, then the file is considered to have an implicit build constraint requiring those terms (in addition to any explicit constraints in the file).

To keep a file from being considered for the build:

1
// +build ignore

(any other unsatisfied word will work as well, but “ignore” is conventional.)

To build a file only when using cgo, and only on Linux and OS X:

1
// +build linux,cgo darwin,cgo

Such a file is usually paired with another file implementing the default functionality for other systems, which in this case would carry the constraint:

1
// +build !linux,!darwin !cgo

Naming a file dns_windows.go will cause it to be included only when building the package for Windows; similarly, math_386.s will be included only when building the package for 32-bit x86.

Using GOOS=android matches build tags and files as for GOOS=linux in addition to android tags and files.

Binary-Only Packages

It is possible to distribute packages in binary form without including the source code used for compiling the package. To do this, the package must be distributed with a source file not excluded by build constraints and containing a “//go:binary-only-package” comment. Like a build constraint, this comment must appear near the top of the file, preceded only by blank lines and other line comments and with a blank line following the comment, to separate it from the package documentation. Unlike build constraints, this comment is only recognized in non-test Go source files.

The minimal source code for a binary-only package is therefore:

1
2
3
//go:binary-only-package
package mypkg

The source code may include additional Go code. That code is never compiled but will be processed by tools like godoc and might be useful as end-user documentation.

more >>

time wheel来实现一个定时器

2017-08-28

时间轮

time-wheel

只需要启动一个定时器, 这个定时器就跟时钟一样转动, 一次只会跳动一个固定的时间, 我们叫做tick, 假设这个tick为1s, 如果一轮的槽数为60, 那就跟现实生活中的时钟没什么两样.

只需要把定时任务加入到相应过期时间的槽当中, 比方说当前指针指向的位置为pos, 那么要在3秒后过期一个任务, 只需要在下标为pos+3的槽中挂上这个定时任务即可, 当指针按频率转动到该槽的时候, 这个槽上的所有任务都被通知过期. 这样也就实现了一个timer实现多个定时任务的功能, 往往在服务端中, 可以节省大量的CPU.

具体的实现可以看看这里

more >>

PingCAP 2018 校园招聘

2017-08-16

来不及解释了, 赶紧上船吧. PingCAP 2018 Campus Recruiting

现在 PingCAP 的 Office 有北京, 上海, 广州, 硅谷.

如果你对开源有兴趣, 那么赶紧投简历吧 wink@pingcap.com.

github: PingCAP/TiDB

公司介绍
PingCAP 是国内第一家开源的新型分布式 NewSQL 数据库公司,秉承开源是基础软件的未来这一理念, PingCAP 持续扩大社区影响力,致力于前沿技术领域的创新实现。其独立研发项目 TiDB 灵感来自于 Google Spanner/F1,具备『分布式强一致性事务、在线弹性水平扩展、故障自恢复的高可用、跨数据中心多活』等核心 NewSQL 特性,是大数据时代理想的数据库集群和云数据库解决方案。

网站主页:www.pingcap.com
简历投递:hire@pingcap.com
邮件主题:[校招]职位名-学校-姓名
校招对象:2018 届毕业生,热爱开源,有好奇心,喜欢挑战

加入 PingCAP,你将获得

  • 丰厚的薪酬福利,优越的办公环境;
  • 大数据时代的朝阳产业,前景远大;
  • 可以获得与业内顶尖大牛过招的机会,技术团队来自豌豆荚、BAT、京东、小米、搜狗、360等;
  • 接触核心的分布式关系数据库技术,拒绝做『螺丝钉』;
  • 弹性工作不打卡,高效、情怀、扁平管理的企业文化;
  • 定期 Team Building,亲近大自然;
  • 园区内部健身房,工作之余健健身,身体工作两不误。
  • 更多精彩等你来发现…
    Front End Engineer
    这是一个对我们这种做「后端」的公司非常重要的岗位,直接关系到我们能够提供一个什么「样子」的解决方案给我们的客户。
    我们需要把技术上复杂的算法和逻辑隐藏起来,让开发者没有心智负担的使用,而不是终日面对冰冷的命令行接口狂敲。一个现代的商用基础软件,流畅优雅的 UI/UE 必不可少,我们对设计和交互的偏执等同于分布式算法和测试的偏执,不可分割。我们在后边的一切工作和炫酷的技术,都需要同样炫酷的前端来落地。

我们在 enjoy 这个「造物」的过程,希望邀你一起。

哦,对了,我们的技术栈:

  • Bootstrap
  • Vue.js
  • AngularJS
  • HighChart
  • Grunt
  • Less

我们对于前端工程师没有其他别的要求,就是对于「美」有所追求,充满好奇心:)

待遇:
15K-20K + 期权, 13薪 + 奖金
Infrastructure Engineer
如果你:
内心不安,喜欢挑战和创新;
熟悉分布式系统,大数据或者数据库领域;
想和简单有爱的 PingCAP 的工程师们一起做世界级的开源项目。

那么你就是我们要找的人。

在分布式数据库领域有很多迷人的问题需要去解决,如果你对任何一个问题感到无比的好奇,想要深挖究竟,都可以来和我们聊聊。
想深入理解业界最前沿的分布式数据库 Spanner 的设计和思考,如何从 0 到 1 落地实现
如何设计和实现世界前沿的分布式 SQL 优化器,让一个复杂的 SQL 查询变的无比轻快智能
如何在成千上万台集群规模的情况下,实现无阻塞的表结构变更操作,而不影响任何在线的业务
如何实现一个高效的分布式事务管理器,让 ACID 事务在大规模并发的分布式存场景下依然可以高效可靠
如何基于一致性的 Raft 协议实现快速稳定的数据复制和自动故障恢复,确保数据安全
如何在一个 PR 提交之后,快速验证千万级别的 tests 是否全部通过,性能有没有显著提升
……

待遇:
15K-20K + 期权, 13薪 + 奖金
Infrastructure Engineer Intern
你能从工作中学习到什么?
如何构建一个分布式关系数据库;
如何将其包装成为一套完整的商业产品;
亲身参与以上过程,并实践你所掌握的开发技术;
成为未来具有全球影响力的开源分布式数据库产品的早期贡献者。

要求:
熟悉常用的开发语言,熟悉 Golang/Rust 优先。
熟悉分布式系统/数据库系统优先。
有开源项目实践经历优先。
实习优秀者可获得正式工作机会,并有期权。

待遇:
250 / 8小时

联系方式:
hire@pingcap.com

工作地点:
北京 上海 广州 成都

more >>

facebook图片存储之Haystack

2016-04-11

论文在: 这里

一个golang开源版本实现: seaweed-FS

毛剑的版本叫bfs

动机

facebook原来的方案是把图片存在NFS上, 由于细小的文件太多, NFS的metadata比较大(which is hundreds of bytes large), 导致了无法把metadata都cache到内存中, 而且每次要读取一个图片, 至少需要3次磁盘IO, 第一次读取目录元信息, 第二次读取inode, 第三次读取图片

而且对于facebook的图片请求, 存在很多long tail请求, 就是很长时间以来都很冷门的图片.(个人相册并不是热门数据), 这就会导致很多请求都不能命中CDN或者自身的cache, 直接落到了磁盘.

所以它们做了haystack

more >>
  • haystack
  • facebook
  • paper
  • tech

more >>

etcd client DNS Discovery

2016-04-10

我们都知道etcd可以作为Discovery Service来使用, 详见, 但是作为etcd自身, 怎么被etcd client发现呢? 下面就介绍一下etcd client的做法.

(cluster启动的自我发现在这里就不介绍了, 一般用init-cluster就可以了, 详见)dns discovery 可以作为 client 发现etcd cluster的机制, -discovery-srv flag 可以用来指定找到etcd cluster的域名. 下面的 DNS SRV records 按列出顺序被查找(这里只介绍client的discover):

  • _etcd-client._tcp.example.com
  • _etcd-client-ssl._tcp.example.com
more >>
  • etcd
  • tech

more >>

golang vendor

2016-04-07

golang vendor是为了解决golang依赖的问题的, 因为golang的依赖都是以源码的形式存在的, 所以如果别的项目变更了API, 这个时候很有可能会让你的代码无法通过编译. 在vendor出来之前, 一般都是用godep来解决的, godep是把这些依赖的源代码复制到当前的Godeps目录, 然后go build 变成 godep go build

godep算是一个妥协的产物, 但它毕竟更改了go build的原义, 所以这个方案还是不够满意, 所以vendor来了. go1.5需要通过GO15VENDOREXPERIMENT=1环境变量开启, go1.6默认开启

more >>
  • golang
  • tech

more >>

tidb笔记2

2016-04-06

tidb index实现

tidb的index不像mysql那样, 由于tidb对于value的获取全是kv操作, 不需要有实质的查询优化, 其只需要用来保证相应的unique等特性跟mysql表现一致即可, 所以tidb的index更多的像是一种兼容的方案.

more >>
  • tidb
  • tech

more >>

tidb笔记1

2016-04-06

tidb笔记1

语法解析

tidb的语法解析有一些语句并没有作支持: REPLACE

go build -ldflags参数

在Makefile中, 有这么一句:

1
2
3
4
5
6
7
8
9
10
LDFLAGS += -X "github.com/pingcap/tidb/util/printer.TiDBBuildTS=$(shell date -u '+%Y-%m-%d %I:%M:%S')"
LDFLAGS += -X "github.com/pingcap/tidb/util/printer.TiDBGitHash=$(shell git rev-parse HEAD)"
...
server:
ifeq ($(TARGET), "")
@cd tidb-server && $(GO) build -ldflags '$(LDFLAGS)'
else
@cd tidb-server && $(GO) build -ldflags '$(LDFLAGS)' -o '$(TARGET)'
endif
more >>
  • tidb
  • tech

more >>

12Next »
© 2019 wink